Upterm
Upterm is an open-source tool enabling developers to share terminal sessions securely over the web. It’s perfect for remote pair programming, accessing computers behind NATs/firewalls, remote debugging, and more.
This is a blog post to describe Upterm in depth.
 Quick Demo
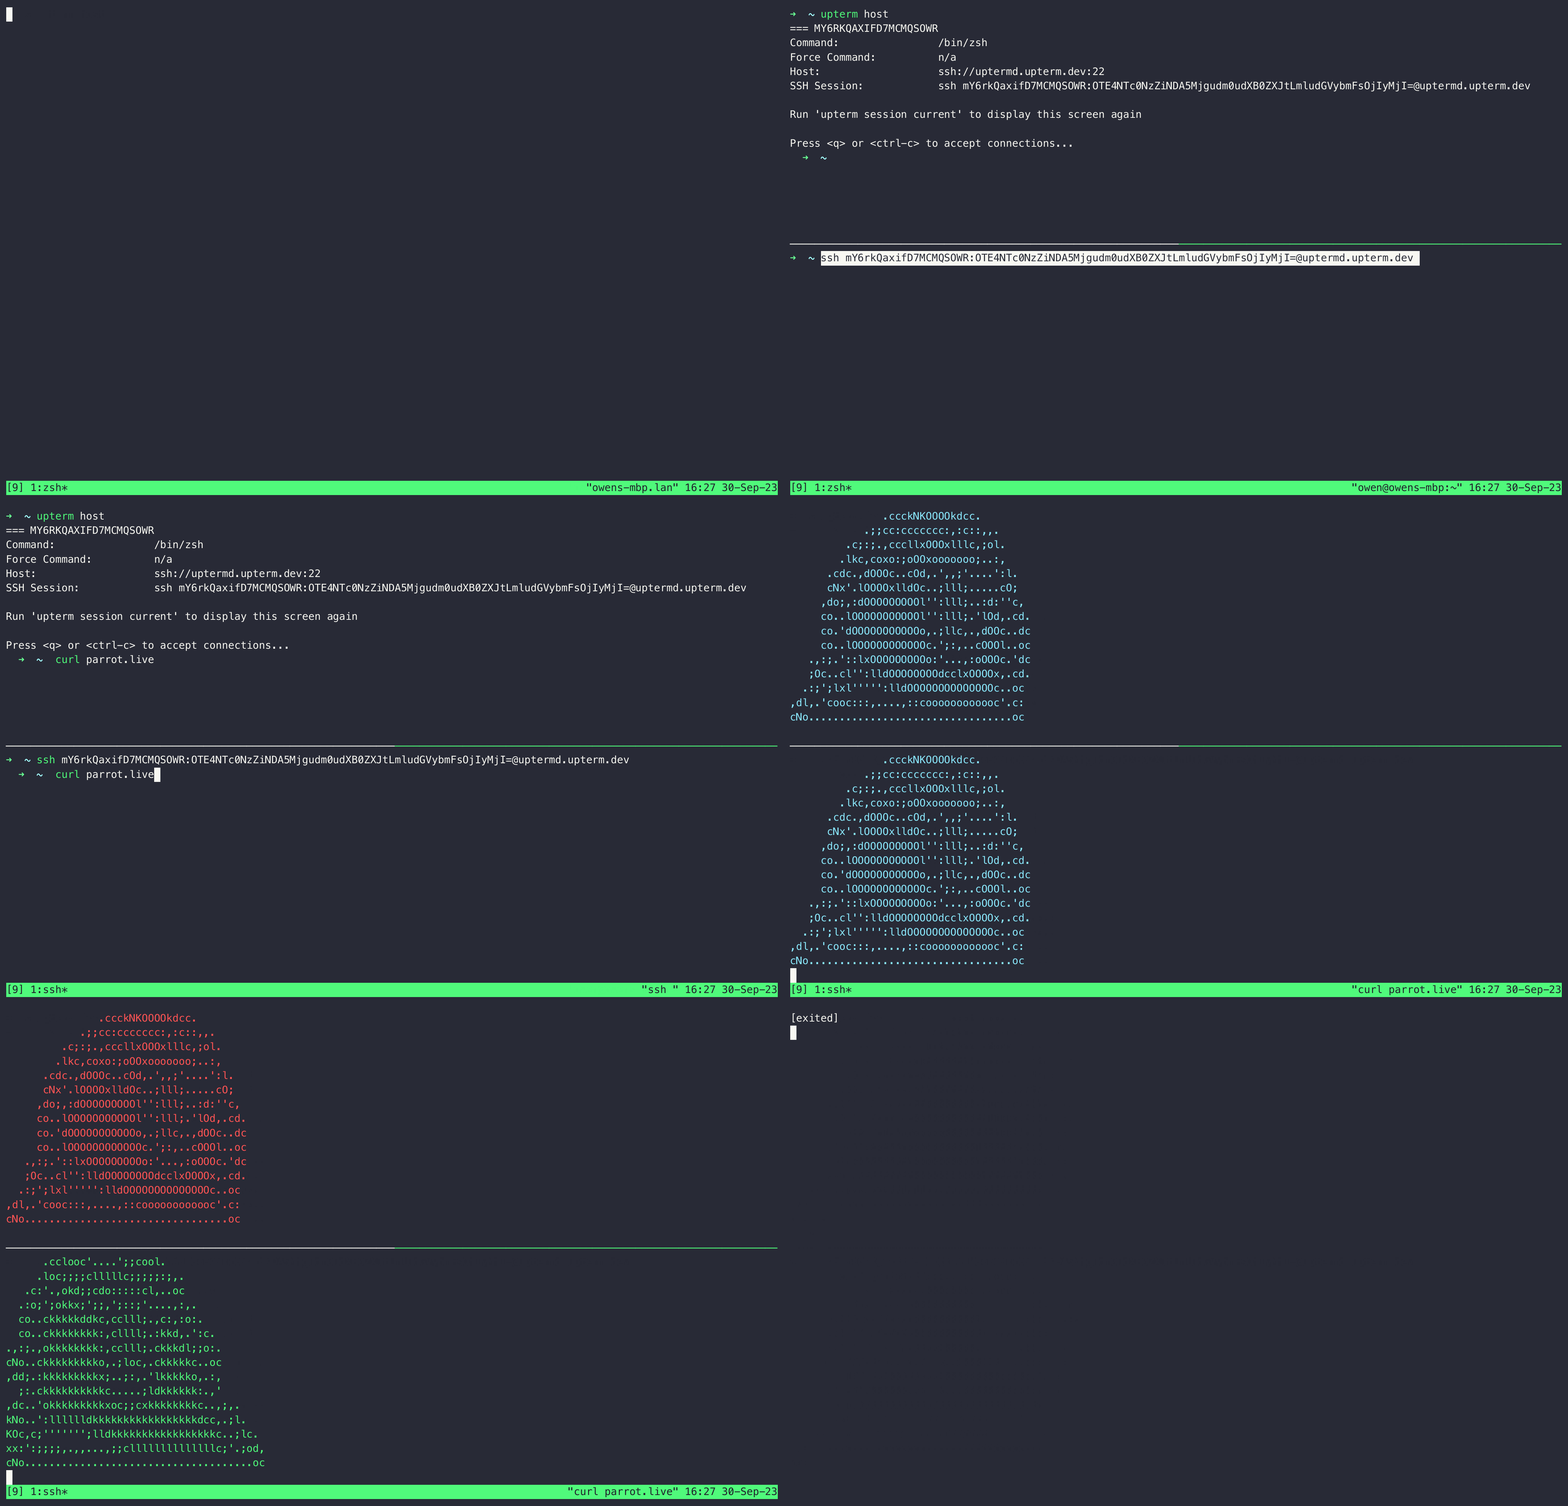
 Getting Started
Installation
Mac
brew install --cask owenthereal/upterm/upterm
Migrating from Formula to Cask
If you previously installed upterm using the Homebrew formula (without --cask), you’ll need to migrate to the Cask version:
# Uninstall the old formula version
brew uninstall upterm

# Install the new Cask version
brew install --cask owenthereal/upterm/upterm
Note: Running brew upgrade with the old formula installed will fail with an error. Follow the migration steps above to resolve this.
Windows
scoop bucket add upterm https://github.com/owenthereal/scoop-upterm
scoop install upterm
Standalone
upterm can be easily installed as an executable. Download the latest compiled binaries and put it in your executable path.
Go
go install github.com/owenthereal/upterm/cmd/upterm@latest
From source
git clone https://github.com/owenthereal/upterm.git
cd upterm
go install ./cmd/upterm/...
 Basic Usage
-
Host starts a terminal session:
upterm host -
Host retrieves and shares the SSH connection string:
upterm session current -
Client connects using the shared string:
 Quick Reference
Dive into more commands and advanced usage in the documentation. Below are some notable highlights:
Command Execution
Host a session with any desired command:
upterm host -- docker run --rm -ti ubuntu bash
Access Control
Host a session with specified client public key(s) authorized to connect:
upterm host --authorized-keys PATH_TO_PUBLIC_KEY
Or authorize users by provider:username, fetching their public keys from a
code-hosting service:
upterm host --authorized-user github:username
upterm host --authorized-user gitlab:username
upterm host --authorized-user srht:username
upterm host --authorized-user codeberg:username
Self-hosted instances are supported by naming the host. gitea and forgejo
always require one, since there is no default instance. Keys are always fetched
over HTTPS:
upterm host --authorized-user github:[email protected]
upterm host --authorized-user gitea:[email protected]
upterm host --authorized-user forgejo:[email protected]
upterm host --authorized-user https://git.example.com/username
For a GitHub Enterprise Server instance that requires a login, authenticate
first with gh auth login --hostname ghe.example.com; only credentials stored
for that host are used.
SSH agents and hardware keys
upterm host authenticates to the server with your SSH identity once, when
the tunnel is established, the same as ssh would. Everything after that —
guest joins, upterm attach, key renegotiation — uses a key generated for
the session, so an agent that confirms each signature (gpg-agent with a
smartcard, 1Password, a FIDO key) asks once, at start.
To keep such an agent out of it entirely, name a plain key. A supplied
--private-key is the whole set, like OpenSSH’s IdentitiesOnly:
ssh-keygen -t ed25519 -N '' -f ~/.ssh/upterm
upterm host --private-key ~/.ssh/upterm
To use one particular agent identity, name its public key:
upterm host --private-key ~/.ssh/id_ed25519_sk.pub
Guests still authenticate with a key of their own. A session with no
--authorized-keys or --authorized-user accepts any key, but not none.
Force command
Host a session initiating tmux new -t pair-programming, while ensuring clients join with tmux attach -t pair-programming.
This mirrors functionality provided by tmate:
upterm host --force-command 'tmux attach -t pair-programming' -- tmux new -t pair-programming
Running Without a Terminal
Host a session from a script or CI step with nothing attached to its terminal. --accept skips the confirmation prompt, --name gives the session a local name you choose, and --pty-size pins the terminal geometry so the command renders the same for every client:
upterm host --accept --name build-shell --pty-size 132x43 -- bash &
In a fresh environment known_hosts does not yet hold the relay’s key, and the host-key confirmation cannot be answered without a terminal. Pin it directly:
mkdir -p ~/.ssh && cat >> ~/.ssh/known_hosts <<'EOF'
@cert-authority uptermd.upterm.dev ssh-ed25519 AAAAC3NzaC1lZDI1NTE5AAAAICiecex8Dq718eSe1CCLgLvDmI7AagvCtax7brPFWkh4
@cert-authority [uptermd.upterm.dev]:443 ssh-ed25519 AAAAC3NzaC1lZDI1NTE5AAAAICiecex8Dq718eSe1CCLgLvDmI7AagvCtax7brPFWkh4
EOF
The same two lines are committed at etc/known_hosts/uptermd.upterm.dev, for anyone who would rather fetch the file than paste it — compare the fingerprint of every line in whatever you fetch before trusting it. uptermd.upterm.dev’s host key has the SHA256 fingerprint SHA256:9ajV8JqMe6jJE/s3TYjb/9xw7T0pfJ2+gADiBIJWDPE; that’s the value to check against, however you obtained the key.
Note that ssh-keyscan uptermd.upterm.dev is not equivalent. The relay presents an SSH host certificate, and a known_hosts entry only authorizes one when the line is marked @cert-authority — which ssh-keyscan does not emit. With a plain key line, upterm falls back to its first-connection prompt: an operator at a terminal still sees the fingerprint there and can compare it by hand, but on a runner with no terminal that prompt can’t be answered, so nothing gets verified.
--skip-host-key-check accepts whatever answers on the first connection. It is convenient for a self-hosted relay you are bringing up, and it is not a substitute for pinning: on a fresh runner it will trust anything that can intercept that connection.
If this key is ever rotated, a pin pasted into a job has to be updated by hand: the fingerprint here changes, and so does the copy bundled with action-upterm, which needs a release of its own. A stale pin does not surface as a host-key mismatch: known_hosts simply holds no authority for the rotated key, which upterm treats as an unknown host. A job with no terminal therefore fails, because the first-connection prompt cannot be answered; an interactive run is prompted instead and could accept the new key, so update the pin rather than accepting at the prompt. Watch this section after upgrading.
Look the session up by name while it runs and after it ends. The record outlives the process and carries how the command finished:
upterm session info build-shell -o json
The status field is starting, ready, disconnected or ending while the session still holds its name, and ended once nobody does; reason is exited (with exitCode), signaled (with signal and originating signalNumber), stopped (explicit admin stop), canceled (parent cancellation), join_timeout, startup_failed, startup_abandoned (declined at the confirmation prompt) or unknown.
upterm session wait NAME returns the command’s exit code, 0 for explicit stop or join timeout, 128 plus the originating signal number for host or command signals, and 125 for cancellation or unavailable outcomes. Lookup, read and replacement failures, and cancellation of the waiter’s context, return 125 with a diagnostic; interrupting the observer leaves the session alive. Legacy stopped records remain successful; legacy signal records without a valid numeric signal return 125. The on-disk record calls the numeric field signal_number.
To keep a session open while a build runs and give people a window to join only if it fails, set the join timeout when the build is done instead of at launch. The script keeps the build’s exit status, and works under set -e:
upterm host --detach --accept --name build -- bash
build_exit_code=0
make || build_exit_code=$?
if [ "$build_exit_code" -ne 0 ]; then
  # Ten minutes for someone to join; once they have, it runs until they exit.
  if upterm session set build --join-timeout 10m; then
    upterm session wait build || true
  fi
fi
upterm session stop build || true   # ends it either way; never masks the build's result
exit "$build_exit_code"
The variable is build_exit_code rather than status, which zsh reserves. Interrupting upterm session wait on its own leaves the session running; in this script it falls through to session stop, which ends it. Each session set restarts the window from now, so running it again with the same duration extends the deadline; --join-timeout 0 turns it off. A guest who joins at any point, even briefly or only over SFTP, claims the session: the join timeout is off for the rest of its life, and a later session set says so. session info shows the timeout and its deadline (joinTimeout, joinDeadline in the JSON), and where they came from (joinStateSource: the daemon, or the record when the session did not answer). session info, session stop and session set exit 4 when no session has the name.
The hosted command sees its own name in UPTERM_SESSION_NAME. upterm session list shows every live session, including one started under a different XDG_RUNTIME_DIR — a cron job or a system service — reached through the admin socket path its record carries. Records outlive the sessions that wrote them for seven days, and the listing prunes the ones past that.
Put a terminal on a session started without one, from any shell on the same machine:
upterm attach build-shell
Type ~. at the start of a line to detach; the session keeps running, and upterm attach again picks up where the screen left off. On Unix, ~^Z suspends the terminal instead — fg resumes it. --escape-char none sends every keystroke to the session. A session’s own terminal counts as a client too: session info lists it as host and guests as guest. In its JSON, guestCount counts currently connected guests (including forwarding, excluding host terminals); scripts asking whether a terminal or SFTP guest has ever joined should use firstGuestJoinedAt.
File Transfer (SFTP/SCP)
Clients can transfer files using standard scp or sftp commands. The connection details are shown when running upterm session current:
# Download a file from host
scp -P PORT USER@HOST:/path/to/file.txt ./local/

# Upload a file to host
scp -P PORT ./local/file.txt USER@HOST:/path/to/destination/
Security model:
- File transfers have the same access as the terminal session (clients can already access any file via the shell)
- Without
--accept, each file operation prompts the host for approval via a dialog. Where no dialog can be shown (no display, such as over SSH, or on Linux nozenity,qarmaormatedialogto draw it), the operation is denied - Use
--read-onlyto restrict SFTP to downloads only (no uploads, deletes, or modifications) - Use
--no-sftpto disable file transfers entirely
Local TCP Forwarding
Clients can use standard SSH local forwarding through a hosted session when the host opts in:
upterm host --allow-local-tcp-forwarding
ssh -L 5555:127.0.0.1:8080 [email protected]
After the first successful forward, the guest appears in session info and join/leave notifications until its SSH connection closes, even between forwarding channels. Multiple forwards on that connection share one entry; terminal and SFTP sessions retain their own entries. Forwarding alone does not set firstGuestJoinedAt or satisfy --join-timeout: an accepted terminal or SFTP session must join before that deadline. An idle ssh -N connection or a failed forward does not appear.
WebSocket Connection
In scenarios where your host restricts ssh transport, establish a connection to uptermd.upterm.dev (or your self-hosted server) via WebSocket:
upterm host --server wss://uptermd.upterm.dev -- bash
Clients can connect to the host session via WebSocket as well:
ssh -o ProxyCommand='upterm proxy wss://[email protected]' [email protected]:443
HTTP Proxy
If the host can only reach the internet through an HTTP proxy, pass it with --proxy. It works with ssh://, ws:// and wss:// servers, so the default server works too as long as the proxy allows CONNECT to port 22:
upterm host --proxy http://proxy.example.com:3128 -- bash
Without --proxy, ws:// and wss:// connections already use HTTPS_PROXY/HTTP_PROXY, but ssh:// connections go direct. Many corporate proxies only allow CONNECT to port 443; in that case, use --server wss://uptermd.upterm.dev as well.
Like other flags, --proxy can be set with UPTERM_PROXY or as proxy in the config file, which keeps proxy credentials off the command line. Clients behind a proxy pass the same flag to upterm proxy.
Debug GitHub Actions
upterm can be integrated with GitHub Actions to enable real-time SSH debugging, allowing you to interact directly with the runner system during workflow execution. This is achieved through action-upterm, which sets up an upterm session within your CI pipeline.
To get started, include action-upterm in your GitHub Actions workflow as follows:
name: CI
on: [push]
jobs:
  build:
    runs-on: ubuntu-latest
    steps:
    - uses: actions/checkout@v2
    - name: Setup upterm session
      uses: owenthereal/action-upterm@v2
This setup allows you to SSH into the workflow runner whenever you need to troubleshoot or inspect the execution environment. Find the SSH connection string in the Checks tab of your Pull Request or in the workflow logs.
action-upterm v2 runs the session on upterm’s own background daemon (upterm host --detach) instead of tmux, and requires upterm v0.32.0 or newer, which it installs by default. upterm itself enforces wait-timeout-minutes: attached mode passes it as --join-timeout, and detached mode hands it over with upterm session set once the job’s other steps are done. The first guest to join claims the session for good, even one who left again before the window opened.
For comprehensive details on configuring and using this integration, visit the action-upterm GitHub repo.
Debug Other CI Systems
Everything the GitHub Action does is available from the CLI, so the same pattern works on GitLab, Buildkite, a self-hosted runner, or any script: start a detached session, print the join command, and block until someone has used it — or until nobody has joined in time.
command -v jq >/dev/null || { echo "this recipe needs jq" >&2; exit 1; }

# Pin the relay's key so a clean runner with no terminal verifies it instead
# of trusting whatever answers; see "Running Without a Terminal" for the
# fingerprint to check it against.
known_hosts=$(mktemp)
cat > "$known_hosts" <<'EOF'
@cert-authority uptermd.upterm.dev ssh-ed25519 AAAAC3NzaC1lZDI1NTE5AAAAICiecex8Dq718eSe1CCLgLvDmI7AagvCtax7brPFWkh4
@cert-authority [uptermd.upterm.dev]:443 ssh-ed25519 AAAAC3NzaC1lZDI1NTE5AAAAICiecex8Dq718eSe1CCLgLvDmI7AagvCtax7brPFWkh4
EOF

# Start detached, capture name + join command in one shot.
upterm host --detach --accept --output json \
  --known-hosts "$known_hosts" \
  --authorized-user "github:${DEBUG_USER:?set DEBUG_USER to the GitHub user who may join}" \
  --join-timeout 10m -- bash > session.json || exit
name=$(jq -er .name session.json) || exit

# End the session however this script ends: finished, cancelled or timed out.
trap 'upterm session stop "$name" 2>/dev/null || true' EXIT
trap 'exit 130' INT
trap 'exit 143' TERM

echo "join: $(jq -r .sshCommand session.json)"
upterm session wait "$name" & wait $! || true   # waiting in the shell lets a signal interrupt it
- The job pins the relay’s key with
--known-hosts, so a fresh runner with no terminal verifies the relay rather than trusting whatever answers. See “Running Without a Terminal” for the published key and its fingerprint. -
--authorized-useris not optional on a shared runner: the join command ends up in a log. SetDEBUG_USERto the GitHub account that should get in; the recipe stops if it is unset. For another provider, replace the wholegithub:value (gitlab:NAME,codeberg:NAME,srht:NAME,gitea:NAME@HOSTand--authorized-keys FILEwork too). - Leaving out
--namelets upterm pick a name no other session on the machine holds, so concurrent jobs on one worker cannot stop each other’s sessions; the recipe reads it back from the JSON. - The recipe checks for
jqbefore it starts anything, and|| exitstops the step when the session did not start (for example, the relay is unreachable), instead of letting it pass without one. -
--join-timeoutends the session if no guest joins within that long, and exits 0, so an unanswered debug session does not fail the build. Once a guest has joined it never re-arms. -
upterm session waitblocks until the session ends and exits with its outcome — 0 for a join timeout or an explicitsession stop. A guest who disconnects without exiting the shell leaves the session running until the job ends. - The session runs in its own background daemon, which a runner that stops only the job’s processes would leave behind, so the
trapstops it when the script finishes, is cancelled or times out, whether the runner signals the whole job or only this shell; a cancelled script still exits non-zero (130 for SIGINT, 143 for SIGTERM). A runner that kills the job outright, with no SIGINT or SIGTERM first, gives the trap no chance: stop the session from the job’s cleanup hook there. Expect this on Windows: GitHub Actions’ Windows runners end a cancelled Git Bash step without running any of its traps. - To open the session before the build and count only after a failure, leave
--join-timeoutoff theupterm hostline and use the failed-build script under “Running Without a Terminal”.
 Tips
Tips
Resolving Tmux Session Display Issue
Issue: The command upterm session current does not display the current session when used within Tmux.
Cause: This occurs because upterm session current requires the UPTERM_ADMIN_SOCKET environment variable, which is set in the specified command. Tmux, however, does not carry over environment variables not on its default list to any Tmux session unless instructed to do so (Reference).
Solution: To rectify this, add the following line to your ~/.tmux.conf:
set-option -ga update-environment " UPTERM_ADMIN_SOCKET UPTERM_SESSION_NAME"
Identifying Upterm Session
Issue: It might be unclear whether your shell command is running in an upterm session, especially with common shell commands like bash or zsh.
Solution: Use upterm session current -o go-template to customize your shell prompt with session info. Add to your ~/.bashrc or ~/.zshrc:
# Show 🆙 emoji and connected client count when in upterm session
export PS1='$(upterm session current -o go-template="🆙  " 2>/dev/null)'"$PS1"
Template variables available (Go templates use PascalCase field names):
- `` - Session ID
- `` - Number of connected clients
- `` - Server host
- `` - Command being shared
- `` - Force command (if set)
Note: JSON output (
-o json) uses camelCase keys (e.g.,sessionId,clientCount).Tip: The same template mechanism can be used for terminal titles or other integrations.
Alternative (simpler, without client count):
export PS1="$([[ ! -z "${UPTERM_ADMIN_SOCKET}" ]] && echo -e '\xF0\x9F\x86\x99 ')$PS1"
 How it works
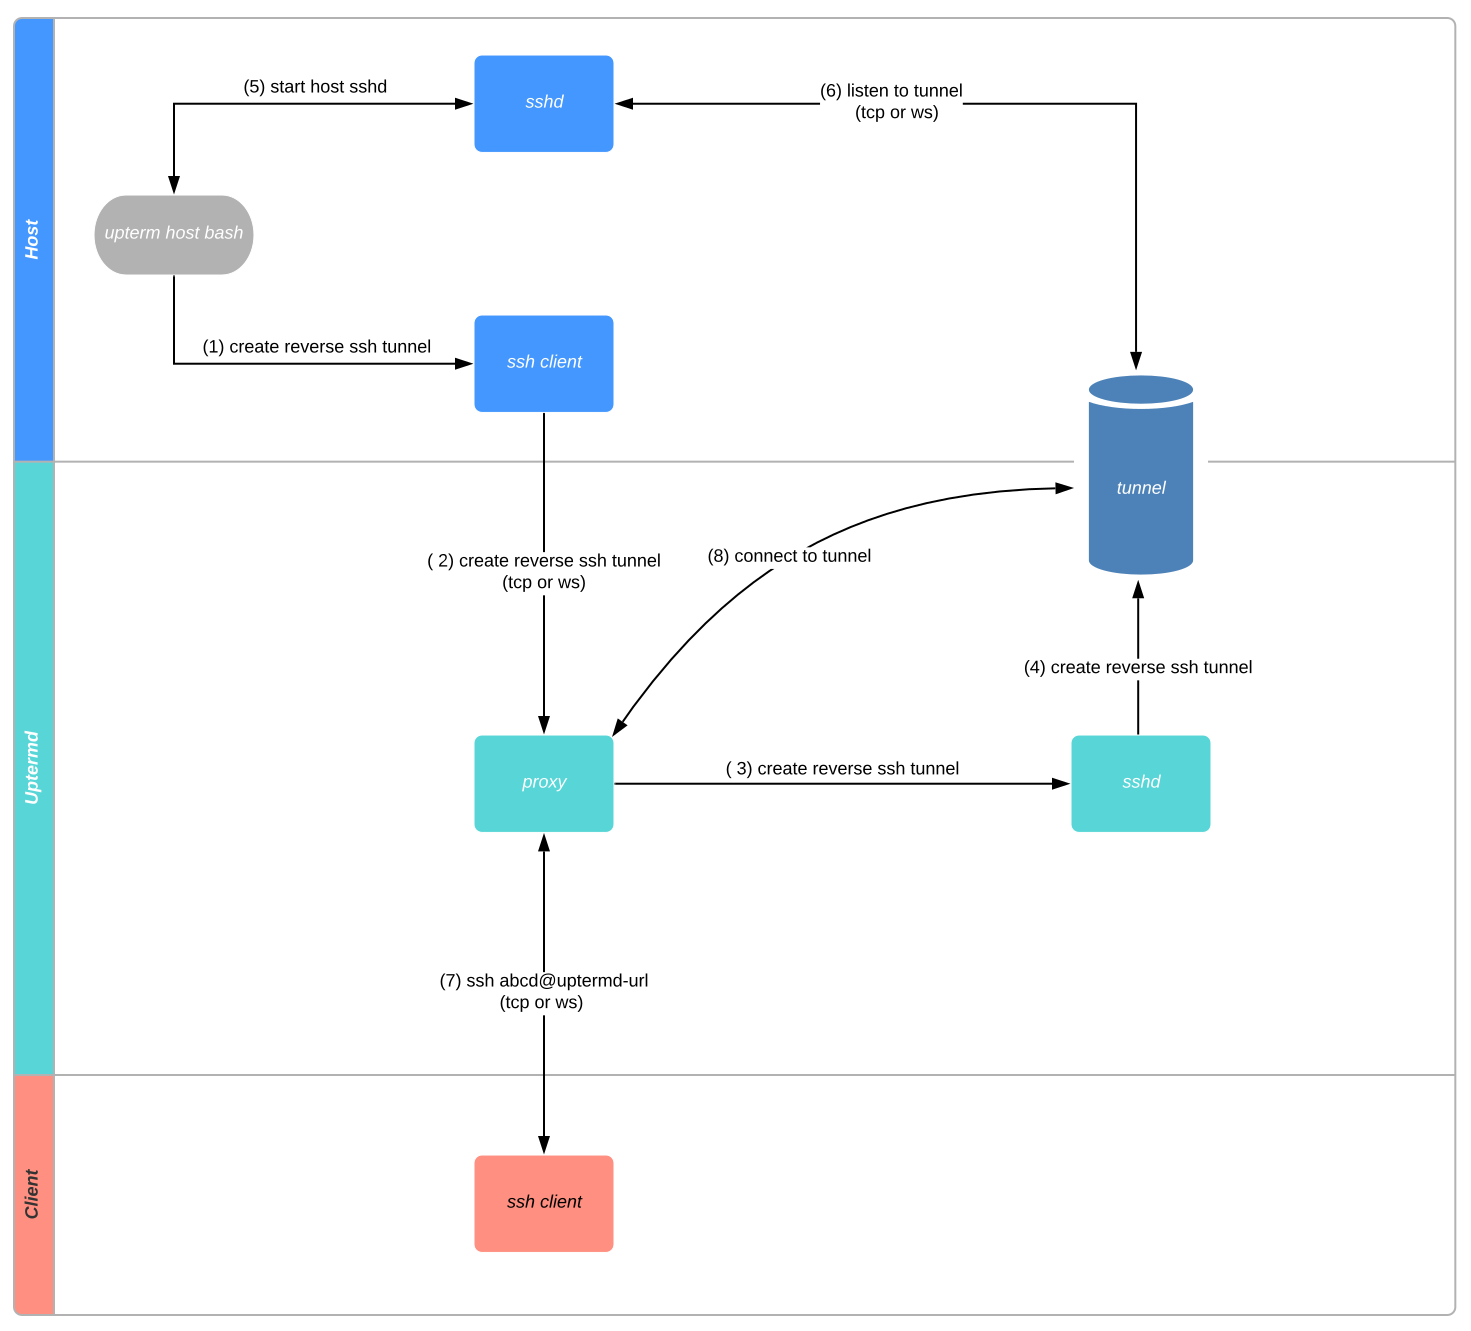
Upterm starts an SSH server (a.k.a. sshd) in the host machine and sets up a reverse SSH tunnel to a Upterm server (a.k.a. uptermd).
Clients connect to a terminal session over the public internet via uptermd using ssh or ssh over WebSocket.
 Deployment
Kubernetes
You can deploy uptermd to a Kubernetes cluster. Install it with helm:
helm repo add upterm https://upterm.dev
helm repo update
helm install uptermd upterm/uptermd
Fly.io
The cheapest way to deploy a worry-free Upterm server (a.k.a. uptermd) is to use Fly.io.
Fly offers a generous free tier and excellent global performance. The official uptermd community server is hosted on Fly.
-
Install the Fly CLI and authenticate:
curl -L https://fly.io/install.sh | sh flyctl auth login - Copy
fly.example.tomltofly.tomland set your app name. It pulls the publishedghcr.io/owenthereal/upterm/uptermdimage, so no local build is needed. - Deploy your uptermd server:
flyctl deploy
Your uptermd server will be available at your-app-name.fly.dev. You can connect using either SSH or WebSocket protocols.
Upgrading from an earlier release:
uptermd-flyno longer exists. Replace your[build] dockerfile/build-targetand[experimental] entrypointsettings with the[build] imageand[env]blocks shown infly.example.toml.
Variable expansion in configuration
uptermd expands environment variable references in its text configuration
values — flags, UPTERMD_* environment variables, and config files alike. This
exists because the container image has no shell, so values that need a runtime
value (a machine ID, a pod IP) cannot be interpolated before the process starts.
Expansion applies to text values only. Boolean options — --debug and
--ssh-proxy-protocol — are parsed before expansion runs, so a reference such
as UPTERMD_DEBUG=${DEBUG_ENABLED} fails at startup with a parse error rather
than being substituted. Give booleans a literal true or false.
| Syntax | Meaning |
|---|---|
${NAME} |
Required. uptermd exits at startup if NAME is unset or empty. |
${NAME:-default} |
Uses default when NAME is unset or empty. |
$${ |
A literal ${ (outside defaults only). |
A $ not followed by { is always literal, and substituted values are never
rescanned — a password containing ${TOKEN} is passed through untouched. The $${ escape applies only outside defaults; a default value cannot contain ${ or }.
Comma-separated lists are split before expansion, so a substituted value is always a single element — with HOSTS=a.example.com,b.example.com, setting UPTERMD_HOSTNAME=${HOSTS} produces one element, not two.
If an existing configuration value contains a literal ${, escape it as $${.
Heroku
You can deploy an Upterm server (a.k.a. uptermd) to Heroku.
Note that Heroku discontinued their free tier in November 2022, so this option now requires paid plans.
You can deploy with one click of the following button:

You can also automate the deployment with Heroku Terraform. The Heroku Terraform scripts are in the terraform/heroku folder. A util script is provided for your convenience to automate everything:
git clone https://github.com/owenthereal/upterm
cd upterm
Provision uptermd in Heroku Common Runtime. Follow instructions.
bin/heroku-install
Provision uptermd in Heroku Private Spaces. Follow instructions.
TF_VAR_heroku_region=REGION TF_VAR_heroku_space=SPACE_NAME TF_VAR_heroku_team=TEAM_NAME bin/heroku-install
You must use WebSocket as the protocol for a Heroku-deployed Uptermd server because the platform only support HTTP/HTTPS routing. This is how you host a session and join a session:
Use the Heroku-deployed Uptermd server via WebSocket
upterm host --server wss://YOUR_HEROKU_APP_URL -- YOUR_COMMAND
A client connects to the host session via WebSocket
ssh -o ProxyCommand='upterm proxy wss://TOKEN@YOUR_HEROKU_APP_URL' TOKEN@YOUR_HEROKU_APP_URL:443
Digital Ocean
There is an util script that makes provisioning Digital Ocean Kubernetes and an Upterm server easier:
TF_VAR_do_token=$DO_PAT \
TF_VAR_uptermd_host=uptermd.upterm.dev \
TF_VAR_uptermd_acme_email=YOUR_EMAIL \
TF_VAR_uptermd_helm_repo=http://localhost:8080 \
TF_VAR_uptermd_host_keys_dir=PATH_TO_HOST_KEYS \
bin/do-install
Systemd
A hardened systemd service is provided in systemd/uptermd.service. You can use it to easily run a
secured uptermd on your machine:
cp systemd/uptermd.service /etc/systemd/system/uptermd.service
systemctl daemon-reload
systemctl start uptermd
Traefik
Below is an example docker-compose configuration for deploying uptermd behind Traefik, including support for both SSH and WebSocket connections:
services:
  upterm:
    build:
        context: https://github.com/owenthereal/upterm.git
        dockerfile: Dockerfile.uptermd
    labels:
      - "traefik.enable=true"
      - "traefik.docker.network=web"
      # SSH over TCP (port 2222)
      - "traefik.tcp.services.uptermd.loadbalancer.server.port=2222"
      - "traefik.tcp.services.uptermd.loadbalancer.proxyProtocol.version=2" # required for real IP forwarding over TCP
      - "traefik.tcp.routers.uptermd.service=uptermd"
      - "traefik.tcp.routers.uptermd.rule=HostSNI(`*`)"
      - "traefik.tcp.routers.uptermd.entrypoints=uptermd"
      # WebSocket over HTTPS (port 8443)
      - "traefik.http.services.uptermd-wss.loadbalancer.server.port=8443"
      - "traefik.http.routers.uptermd-wss.service=uptermd-wss"
      - "traefik.http.routers.uptermd-wss.rule=Host(`upterm.example.com`)" # edit as needed
      - "traefik.http.routers.uptermd-wss.entrypoints=websecure"
      - "traefik.http.routers.uptermd-wss.tls.certresolver=<your cert resolver here>"

    command:
      - --ssh-addr=0.0.0.0:2222
      - --ws-addr=0.0.0.0:8443
      - --ssh-proxy-protocol

    networks:
      - web

networks:
  web:
    external: true
Important notes:
-
Proxy Protocol: The
--ssh-proxy-protocolflag (orUPTERMD_SSH_PROXY_PROTOCOL=trueenvironment variable) tellsuptermdto expect the PROXY protocol header on incoming SSH connections. This is essential when using Traefik (or other TCP proxies like HAProxy or AWS ELB) to preserve the real client IP address. If you enable--ssh-proxy-protocol, all incoming SSH connections must come through a proxy that supports and is configured to use the PROXY protocol. Direct SSH connections will fail, asuptermdwill expect the protocol header. -
Entrypoints: Make sure to configure the appropriate Traefik entrypoints. This example uses two: one for SSH (
uptermdon port2222) and one for WebSocket/HTTPS (websecureon port443). -
WebSocket: The WebSocket service allows clients to connect to
uptermdover HTTPS, which is useful in restrictive network environments. -
Certificates: Replace
<your cert resolver here>with your actual Traefik certificate resolver for TLS.
For more details on Traefik TCP and HTTP routing, see the Traefik documentation.
Restricting Host Registration
By default, any SSH client that can reach uptermd can register a session as a host.
For private or invite-only deployments, the --authorized-keys flag (or UPTERMD_AUTHORIZED_KEYS environment variable) restricts host registration to a specific set of public keys.
This mirrors OpenSSH’s AuthorizedKeysFile directive.
uptermd --authorized-keys /etc/uptermd/authorized_keys
The flag accepts standard authorized_keys-formatted files (one key per line, comments allowed) and may be repeated to compose keys from multiple sources:
uptermd --authorized-keys /etc/uptermd/team.keys --authorized-keys /etc/uptermd/ops.keys
Files are read once at startup; restart uptermd to pick up edits. Joiners (clients connecting to a session) are unaffected — they continue to be authorized by the host’s own authorized_keys.
For the Helm chart, populate the authorized_keys value:
authorized_keys:
  - "ssh-ed25519 AAAA... alice@laptop"
  - "ssh-ed25519 BBBB... bob@desktop"
Connection Establishment Budget
The --handshake-timeout flag (or UPTERMD_HANDSHAKE_TIMEOUT environment variable) bounds how long a
connection may take to be established, defaulting to 60s. The budget is split evenly: the first half
covers authenticating the incoming connection, the second half covers dialing the upstream and
handshaking with it. A connection that exhausts either half is dropped.
uptermd --handshake-timeout 90s
Raise it for clients on high-latency links or when the session store is slow to answer; lower it to shed
half-open connections sooner. The value must be at least 1s, since each half has to cover a complete SSH
handshake, and less than 2m, since each half must also fit inside the validity window of the short-lived
user certificate uptermd mints while authenticating. 0 selects the default rather than disabling the
timeout.
 Monitoring
uptermd exposes Prometheus metrics at the /metrics endpoint when configured with --metric-addr (or UPTERMD_METRIC_ADDR environment variable).
Available metrics:
-
routing_connections_count(Counter) - Total number of SSH connections accepted -
routing_active_connections_count(Gauge) - Current number of active SSH connections -
routing_connection_duration_seconds(Histogram) - Connection duration in seconds -
routing_errors_count(Counter) - Total number of connection errors -
routing_connection_timeout_count(Counter) - Number of connections that timed out during establishment
 Comparison with Prior Arts
Upterm stands as a modern alternative to Tmate.
Tmate originates as a fork from an older iteration of Tmux, extending terminal sharing capabilities atop Tmux 2.x. However, Tmate has no plans to align with the latest Tmux updates, compelling Tmate & Tmux users to manage two separate configurations. For instance, the necessity to bind identical keys twice, conditionally.
On the flip side, Upterm is architected from the ground up to be an independent solution, not a fork. It embodies the idea of connecting the input & output of any shell command between a host and its clients, transcending beyond merely tmux. This paves the way for securely sharing terminal sessions utilizing containers.
Written in Go, Upterm is more hack-friendly compared to Tmate, which is crafted in C, akin to Tmux. The seamless compilation of Upterm CLI and server (uptermd) into a single binary facilitates swift deployment of your pairing server across any cloud environment, devoid of dependencies.